Tuesday, January 22, 2008

Photos by Day of Year

One last "heat-map", by day of the year:

Jan Feb Mar Apr May Jun Jul Aug Sep Oct Nov DecTotal
1174 390 1 21 3 9 13 51 13 10 16 72773
27 332 20 3 13 19 8 19 49 83 20 15588
337 271 13 9 35 7 93 43 115 39 48 40750
46 86 12 19 4 24 30 186 133 38 144 34716
570 99 2 12 4 5 45 49 70 12 74 52494
673 88   5 57 55 29 93 84 166 120 17787
7169 102 2 55 11 83 30 23 123 39 34 49720
8203 206 3 70   20 58 22 88 39 45 20774
9130 88 7 21 4 89 47 15 51 106 12 78648
1065 154 9 17 5 51 51 25 12 146 12 27574
1130 381 6 46 2 100 58 42 42 134 48 1890
1223 199 20 38 13 35 90 38 29 102 48 3638
1336 190 19 23 3 21 115 59 15 49 2 19551
1450 263 23 10 39 7 104 159 70 17 53 23818
1557 197 3 9 14   32 263 21 92 24  712
1637 199 16 39 10 57 10 188 101 60 45 42804
1766 238 23 20 12 22 80 63 69 16 15 2626
18109 223 15 43 12 70 96 54 53 12 5 9701
19163 239 87 117 17 20 20 110 101 14 108 131009
20164 31 52 97 68 31 64 18 105 5 18 37690
21200   32 73 19 21 28 72 37 22 5 10519
22194 16 1 43 1 63 24 21 112 36 7 20538
23287 7 33 80 9 27 80 18 60 5 32 104742
24176 108 3 4 8 16 47 106 49 17 8 187729
25308 31 15 95 28 34 94 159 56 5 46 3331204
26239 4 15 4 23 50 46 70 88 41 3 90673
27307 24 3 43 15 32 7 67 65 51 41 71726
28239 11 4 43 10 6 26 14 49 41 10 13466
29166   20 7 11 11 32 3 6 24 32 11323
30278   4 36 22 10 27   54 77 44 104656
31336   7   13   17 83   32   192680
Total4399 4177 470 1102 485 995 1501 2133 1920 1530 1119 168821519

Interesting that there are still some "holes" in there after 8 or so years.

Photos by Time of Day

Another "heat-map", photos by time of day for each day of the week:

12am 1 2 3 4 5 6 7 8 9 10 11 12pm 1 2 3 4 5 6 7 8 9 10 11Total
Mon                                                                                                2449
Tue                                                                                                2828
Wed                                                                                                2774
Thu                                                                                                2658
Fri                                                                                                2545
Sat                                                                                                4395
Sun                                                                                                3870
Total222138341281826328360617122319121938182620492094198419781248962137655038922721519

(Hover for a tooltip indicating the actual number of photos in each 15 minute segment.)

Photo Calendar Heatmap

A "heat map" of the number of photos I've taken over the years:

Year Jan Feb Mar Apr May Jun Jul Aug Sep Oct Nov Dec Total
2000 274 337 62 673
2001 237 193 242 100 103 323 972 1335 1214 1053 475 347 6594
2002 270 310 202 125 70 113 19 191 120 18 84 102 1624
2003 1427 810 26 377 45 90 45 45 106 175 39 97 3282
2004 80 38 21 94 43 71 46 138 110 38 211 257 1147
2005 190 80 24 53 58 80 95 55 81 52 43 392 1203
2006 1975 2697 141 330 178 171 48 384 98 15 102 372 6511
2007 298 248 62 129 23 154 246 466 178 179 172 127 2282
2008 165 165
Total4642 4376 718 1208 520 1002 1471 2614 1907 1804 1463 177723502

Green represents the average number of photos, yellow the maximum.

Different events can clearly be seen, some of note:

  • June—October 2001, Travelling in Europe
  • January—February 2003, Travelling in the USA
  • January—February 2006, Roadtrip around Victoria

I'm going to have to find something to do during May...

Friday, January 18, 2008

Cover-art Wallpaper under Ubuntu

This is an update to the previous post to create a cover art "stack" for Windows XP wallpaper to generate and update the wallpaper in Ubuntu.

Not much had to change, except the setWallpaper function:

def setWallpaper( bmp ):
    os.system( "gconftool-2 -t string -s /desktop/gnome/background/picture_filename %s" % bmp.replace(" ","\\ ") )

Ubuntu File System Setup

The following is a rough summary of how I've setup my Ubuntu file system, including some links to resources I found useful.

I have 3 hard-drives, a 500gb drive for the system and "non-critical" files, and two 300gb drives to hold "valuable" data. "Valuable" data includes documents, photos, source-code, music and some videos, less valuable "non-critical" data includes recorded TV programs, movies and so on.

On my Windows XP system I was using a RAID-1 setup to automatically mirror my data drive to protect against hard-drive failure. Using a RAID-1 array keeps everything nice and simple, but under Ubuntu I decided that the tools were more powerful and I would be able to "manually" mirror the data to gain a little more control. In particular, while I want a copy of the data in case of hard-drive failure, a slightly delayed backup in case of catastrophic user error would also be very valuable.

So, each drive is mounted separately, and the 500gb drive is partitioned to give some space for the system and the majority for "stuff" (videos, backups etc.)

I highly recommend partitioning the drives before/during installation, as while it was possible to move everything around, it was time consuming and fiddly. I used a Gparted LiveCD to split my main drive to get a separate /stuff partition, but this took forever (about 15 hours, and my system isn't slow...). I used the GParted LiveCD because this tutorial on installing WinXP on a Linux system suggested that the version of GParted on the Ubuntu LiveCD wouldn't work properly.

This guide on moving /home to a separate partition was helpful, though I think I just used cp -a to copy the files, rather than the complicated find | cpio command..

Once I had it all up and mounted, I created a script to run rsync to mirror the drives:

#!/bin/bash
date >> /home/tom/backup_mirror_home.log
rsync --archive --delete --stats /home/ /homeMIRROR/ 2>&1 >> /home/tom/backup_mirror_home.log

This was added in as a cron job to run every 3 hours, which should be often enough (sudo crontab -e):

# m h  dom mon dow   command
0 */3 * * * /home/tom/backup_mirror_home.sh

The rsync process took a while to copy the 200gb or so across the first time, but is very fast (probably less than a minute) when just synchronizing the existing files as most data on the drive is photos and music that don't change very often.

A useful trick to keep an eye on the progress of the copy operations is watch df. df shows the current usage on the various disks, and watch will run it every 2 seconds so you can watch the percentages change slowly and be convinced something is actually happening.

Once all that was done, I setup sbackup to backup to the /stuff drive and an external USB drive.

My actual process was a little more complicated than described above, as the 300gb drives already contained NTFS partitions with the critical data on them and I wanted to move it over to ext3 while at no point having less than 2 copies of the data. The steps were roughly as follows:

  1. Mount ntfs drive (/dev/sdb), copy data to 500gb drive (/dev/sda)
  2. Format /dev/sdb as ext3, copy data from /dev/sda to /dev/sdb.
  3. Move /home to /dev/sdb, and reorganise it a bit (rename/move folders/files about.)
  4. Format /dev/sdc as ext3, mirror from /dev/sdb

Tuesday, December 04, 2007

Installing Ubuntu was easy!

I just got myself a new computer and started running Ubuntu on it, I'm astonished at how easy the whole process of installation was. Over the years I've installed Windows countless times, always a painful process, though I haven't installed Vista so maybe they finally figured it out.

So, I built the computer, burnt an Ubuntu live CD, put it in and the first suprise was that I hadn't stuffed anything up putting the machine together. The live CD is really functional, and I was able to start up Pidgin, browse the web and most usefully, remote desktop into my old PC.

I only have one keyboard/mouse and monitor and two machines, both of which I want to continue to use for a while as I'm expecting that transitioning from my old system to the new one will take some time as the machine is used for development, as a full media center as well as web browsing etc. and I don't know how long it will take to learn how to do all that under Linux. Being able to remote desktop back to the old machine solves the problem nicely.

After playing with Ubuntu a bit and chatting with friends for a while I clicked "Install". A bit of deliberation was required to determine the partition layout I want, as in the future I expect I will install XP and dual boot. Finding an article on installing XP after Linux set my mind at ease so I figured I'd be able to repartition as necessary later. So I chose all the default install options and that plugged away in the background for a little while.

The truly impressive bit was that while this was happening, I was able to continue chatting with friends to get advice on installation options, search the web for answers and so on. It only required a quick restart and I was all done, and I didn't really stop "working" the whole time.

I did hit two small snags:

  • During the restart I realized I'd "boxed" in the CD drive so had to hastily hit the power switch, pull of the front bezel and open a slot so it could eject... my bad :)
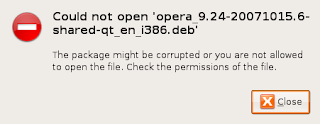
  • Installing Opera didn't go very smoothly, I tried using Add/Remove programs but it failed mysteriously with the following error:
    Downloading the .deb file from the Opera website failed the first time too, but when I ran it again it worked, so there may be something broken with the way the dependencies went on and once they'd be put on by previous attempts it succeeded.

I guess I probably won't have to reinstall Ubuntu as often as I did Windows, but at least I won't dread the process.

Monday, November 19, 2007

Now Playing Album Cover Art Desktop Wallpaper

A little Python program I wrote to update my Windows desktop wallpaper with the album cover art of each album I play. The idea is to represent a stack of CDs with the latest played one on top. This concept could easily be extended to other images, a random photo each day springs to mind.

The details of how this script is run when an album is played and where the album cover art comes from aren't really relevant, and aren't going to work outside my system anyway, but the concept can be used easily enough.

Windows requires a little messing about to change the wallpaper dynamically, and this will only work with BMP files:

def setWallpaper( bmp ):
   import win32api, win32con, win32gui
   k = win32api.RegOpenKeyEx(win32con.HKEY_CURRENT_USER,"Control
Panel\\Desktop",0,win32con.KEY_SET_VALUE)
   win32api.RegSetValueEx(k, "WallpaperStyle", 0, win32con.REG_SZ, "0")
   win32api.RegSetValueEx(k, "TileWallpaper", 0, win32con.REG_SZ, "0")
   win32gui.SystemParametersInfo(win32con.SPI_SETDESKWALLPAPER, bmp, 1+2)

The following functions generate the wallpaper. The main function takes the filename of the wallpaper file, and the name of the new cover image, which will be pasted over the top of the existing wallpaper.

# read bmp in old_filename, "paste" current_filename over the top 
# and write out to new_filename (usually the same as old_filename)
import sys, os, urllib, math, Image, random
def makeBackgroundCollage(old_filename, current_filename, new_filename):
   if os.path.exists( old_filename ):
      new = Image.open( old_filename )
   else:
      new = Image.new( "RGB", (1280, 1024), (58, 110, 165) )
   if os.path.exists( current_filename ):
      current = Image.open( current_filename)
      if max(current.size) < 300:
         current = current.resize( (current.size[0]*2, current.size[1]*2) )
      if max(current.size) > 600:
         current = current.resize( (600, 600 * current.size[1]/current.size[0]) )
      border = Image.new("RGB", (current.size[0]+10, current.size[1]+10), 0xffffff)
      shadow = Image.new("RGB", border.size, 0x000000)
      angle = int(random.betavariate(2,2) * 50 - 25)
      (shadow, shadow_mask) = rotate2(shadow, border.size, angle, 128)
      (current, current_mask) = rotate2(current, border.size, angle)
      (border, border_mask) = rotate2(border, border.size, angle)
      pos = (int(random.betavariate(2,2) * (new.size[0] - border.size[0])),
             int(random.betavariate(2,2) * (new.size[1] - border.size[1])))
      new.paste(shadow, (pos[0]+5, pos[1]+5), shadow_mask)
      new.paste(border, pos, border_mask)
      new.paste(current, pos, current_mask)
   new.save( new_filename )

def rotate2(img, box, angle, alpha=255):
   img2 = Image.new(img.mode, boundingBox(box, angle * math.pi/180.0), 0)
   img2.paste(img, ( img2.size[0]/2 - img.size[0]/2,
                     img2.size[1]/2 - img.size[1]/2 ) )
   mask2 = Image.new("L", img2.size, 0)
   mask2.paste(Image.new("L", img.size, alpha), ( img2.size[0]/2 - img.size[0]/2,
                                                  img2.size[1]/2 - img.size[1]/2 ) )
   return (img2.rotate( angle, Image.BICUBIC ),
           mask2.rotate( angle, Image.BICUBIC ))

def boundingBox(box, angle):
   (x,y) = (box[0]/2.0, box[1]/2.0)
   (r, a) = (math.sqrt(x*x+y*y), math.atan2(y, x))
   (x1, y1) = (r * math.cos( a+angle ), r * math.sin( a+angle ) )
   (x2, y2) = (r * math.cos( -a+angle ), r * math.sin( -a+angle ) )
   return (int(math.ceil(max(abs(x1),abs(x2))*2)),
           int(math.ceil(max(abs(y1),abs(y2))*2)))

The position and rotation of the album is chosen using a beta distribution. This gives a nice distribution weighted towards the center of the screen, borders and a "drop shadow" are added to enhance the "stack" effect.

Tuesday, July 31, 2007

Picaxe breadboard adapter

A quick project to simplify Picaxe prototyping on my breadboard. The idea is to house the Picaxe chip (either an 08M or 14M) and "standard" serial interfacing circuit on a "breakout" board that can be easily plugged into the breadboard while providing easy access to the chip's pins.

  1. power input, about 5V, will be regulated by LM7805
  2. 3.5mm stereo serial socket
  3. serial mode selector, switches serial in between "pin 5" (program mode) and "pin 3" (control mode)
  4. power switch
  5. jumpers to allow isolating standard serial circuit to "override" via breadboard
  6. 14 pin socket
  7. header pins to provide 5V and 0V to "power rails" of breadboard
  8. header pins to connect Picaxe to breadboard


serial schematic


power schematic

For some unknown reason, I had to add an extra 10k resistor between leg 2 and ground (soldered on the underside of the pcb, not shown on schematic.)

The board works pretty much as I'd hoped. Unfortunately it is quite difficult to insert/remove from the breadboard so a future version would only have a single row of header pins. Another addition would be a DC socket to allow powering from a "wall wart" and I'd improve the layout a little to allow easier access to the switches.

Tuesday, July 24, 2007

Handlebar "Remote" for LED Bike Light

Changing modes and using the high-beam was awkward using the switches mounted on the original LED bikelight box, so I added a "remote" within easy reach of my thumb. This will make the high-beam more useful when approaching treacherous areas of paths that require more light but are exactly the places where you don't want to take your hands off the handlebars.

This uses a "rocker" navigation switch to change modes, pushing it switches on the high beam. The mode-up and down buttons are simply wired in in parallel with the existing mode rocker switch, however the high-beam was a bit trickier and uses a BD681 darlington pair transitor to "pull" the control signal to the BuckPuck to ground. This has the same effect as the existing NC push-button switch.

This was necessary because all three switches on the navigation switch share a common wire, the Picaxe software and circuit is expecting the switches to provide +5v, so it was easier to make the high-beam use a transistor to cut-out the control signal than rework the remainder of the circuit to pull the Picaxe pins to ground when the switches are pushed. If I was building this again, using ground as the common wire would be much simpler.

There was enough room on the existing pcb to solder in the transistor, resistor and wires from the navigation switch. That's one advantage of using proto-board over a printed pcb.

One further mod would be to have a capacitor attached to the BD681 some how so that a single push holds the high-beam on for say 5 seconds, but I couldn't figure out how to get that to work. Alternatively, putting in a flip-flop to toggle the high-beam on/off would work too, but there was definitely not enough space on the pcb for that option.

Friday, July 06, 2007

Ambient Email Notifier

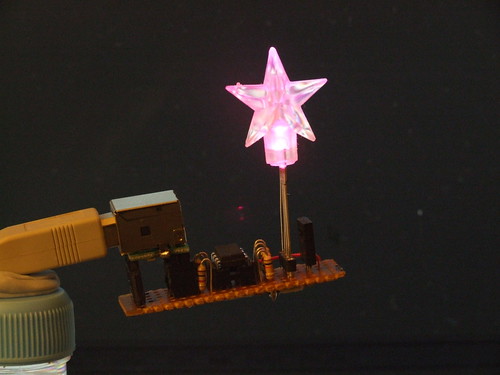
Small project to provide email notification via an RGB LED hooked up to the USB port.

Uses a 4d-micro-USB module to provide power and RS232 to a Picaxe 08M controlling an RGB LED. Can control colour (seven colours: work email in red, newsletters in green, other in blue) and brightness by sending characters to the COM port, this is done by a Python script run every 10 minutes by Task Scheduler with an accompanying system tray icon to allow LED to be turned off again (see python gmail check in four lines of code, pySerial and pySystray).

The schematic is as simple as possible:

The relevant code (python and picaxe basic) is pretty self-evident, I will provide it if anyone is interested. Update: Another post has some code.